This is a sub-page of the multi-page documentation for the OneCellPipe pipeline of OneCellBio.
Here are more detailed instruction for running OneCellPipe on an single machine in the Amazon cloud.
Please note that there AWS will charge for running this type of machine and storage, the costs are usually fairly low though.
We are assuming you have created an account for Amazon Web Services (AWS). (To get started, you can use the free tier offer. You will need an address, an email address and credit card information for that.)
Here are the steps to set up a machine with a spot request (which is cheaper than a regular request, but also might terminate unexpectedly) and either
- Use a standard Ubuntu system and install the software required (option A) or
- Use the OneCellPipe system we provide (option B)
to run the single-cell inDrops pipeline on there.
We strongly recommend using option B, ie. our prepared system (AMI) as this will be the easiest way for you to get started and has been tested by us.
Part 1: Starting a machine in the Amazon cloud
- Log in to your AWS account at https://aws.amazon.com
-

Fig. 1 In the header bar, go to “Services” / “EC2” (fig. 1)
- Choose “Spot Request” on the left side menu and click on “Request Spot Instances”
-
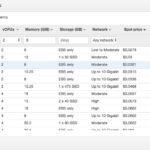
Fig. 2 We will now set the machine details. Please note that you cannot use the machines offered as part of the “Free Tier” as the alignment requires more than 1 GB of RAM.
- AMI:
– option A: select “Canonical, Ubuntu 16.04 LTS”
– option B: Click on “Search for AMI”, select “AMIs shared with me”, select “OneCellPipe-Image” - Instance type. We should choose an instance with 2 CPUs and 8 GB of memory for a test data set. For real data sets with fastq files of a few GB, choose a machine with e.g. 8 CPUs and 30 GB of RAM. You can then sort by the spot price to choose a cheap one, eg. “m4.large” (fig. 2) At this moment it will cost us 3 Cent per hour started in our example. You can also check the “Pricing History” to make sure this machine type does not tend to spike in price in your chosen zone.
-
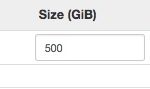
Fig. 3 This machine has no disk space included, so we add e.g. 200 to 500 GB of HDD disk space (fig.3) If your data set is small, 60 GB might be enough. Expect to use four times the space your raw (compressed) fastq files. (Disk space adds additional costs.)
- Security groups: Make sure you choose a security group that allows SSH traffic, otherwise you won’t be able to connect to your instance. You can easily create a new security group using the link on the current AWS page.

Fig. 4 There, make sure you allow “All outbound traffic” and port 22 for inbound SSH traffic, you can allow everyone to connect or restrict to specific IP adresses (fig. 4)
- “Key pair name”: Choose an SSH key file that you have access to or create a new one. You will need to refer to it in the SSH command.
- AMI:
- “Launch” the request. It will take a few seconds or minutes to fulfill and a minute to set up the machine. You can refresh the display with the arrows image on the top right.
- As soon a the request changes from “pending_fulfillment” to “fulfilled” you can click on “Instances” on the left menu to see your new machine. Clicking “Connect” here will show you the “Example” line to use on the SSH command-line, and the “Public DNS” to specify in your SSH client (e.g. PuTTY)
- The machine will go through a few checks, once done you can connect using this DNS (the IP address), your SSH certificate file and the user name “ubuntu”.
- Option 1: If you are connecting via the command-line you can simply type something like:
ssh -i "/users/fred/.ssh/aws-key.pem" ubuntu@ec2-32-239-1-148.compute-1.amazonaws.com
/users/fred/.ssh/aws-key.pem is the path to your SSH key that you have specified in step 4.5.
ec2-32-239-1-148.compute-1.amazonaws.com is the machine address given in step 6. -
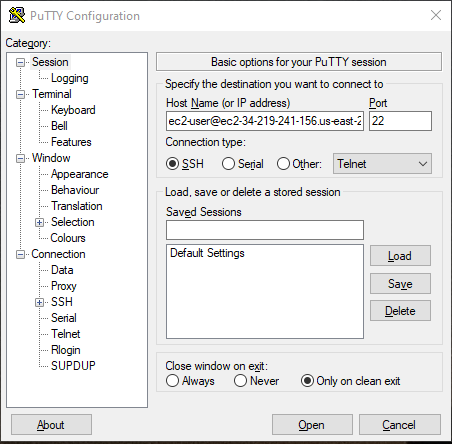
Fig. 5 Option 2: If you prefer an SSH client software like PuTTY (fig. 5), here is some help for the installation and here are instructions for the correct connection.
- Option 1: If you are connecting via the command-line you can simply type something like:
- You are now in the cloud!


Part 2: Installations
For option A only:
-
- Install the required software
- Install optional software:
Use s3fuse to connect to an S3 cloud storage location (recommended):
sudo apt install -y automake autotools-dev fuse g++ git libcurl4-gnutls-dev libfuse-dev libssl-dev libxml2-dev make pkg-config
git clone https://github.com/s3fs-fuse/s3fs-fuse.git
cd s3fs-fuse; ./autogen.sh; ./configure; make; sudo make install
cd ..
- Increase memory tolerance (if necessary)
Add a 2 Gigabyte”swap” file to the system (adjust size to suit your machine):
sudo dd if=/dev/zero of=/var/swapfile bs=1M count=2048
sudo chmod 600 /var/swapfile
sudo mkswap /var/swapfile
echo /var/swapfile none swap defaults 0 0 | sudo tee -a /etc/fstab
sudo swapon -a
Add a system setting to limit the memory Java processes should use (here: minimum 1Gb, maximum 9 Gb, adjust if necessary):
echo export NXF_OPTS="-Xms1G -Xmx9G" >> ~/.bashrc; source ~/.bashrc
For both options, if you want to access your S3 data:
- Add security credentials for AWS / S3 and mount your S3 bucket into a directory within the onecellpipe directory.
Replace all CAPITAL words (AWS access key, secret password and bucket name) with your own settings.# make the S3 password available: echo ACCESS-KEY:SECRET-KEY > /home/ubuntu/onecellpipe/s3.pass chmod 600 /home/ubuntu/onecellpipe/s3.pass # mount S3 as a new directory "s3data": mkdir /home/ubuntu/onecellpipe/s3data s3fs YOUR-BUCKET-NAME /home/ubuntu/onecellpipe/s3data -o passwd_file=/home/ubuntu/onecellpipe/s3.pass -o allow_other -o umask=000
You can manage your access key via users: click on your user name at the top of the AWS browser page and select “My Security Credentials”, then “Users”. Create a new access key and note down the Access key ID and Secret access key. They should look somewhat like IASDJASD8SAFD6SADF and s98JSAD7ASDdssd7UASDASDya4jh3aS
- If you save this machine as your own AMI you can skip all of these steps next time you want to run the analysis and just launch your own image! (Additional AWS storage costs may occur.)
Part 3: Run the test pipeline
Use the sample data provided to test that everything is working.
Here is a real-time screen cast of the processing of the sample data:
Part 4: Process your own data
- Upload your data if it is not in your S3 bucket
To upload your data to the cloud machine you can use scp from your local machine. Some alternatives are provided here. In this example I have compressed all FASTA files from the directory run1-fasta-files to an archive fasta.tgz:
tar czvf fasta.tgz run1-fasta-files
Open a new terminal window and modify the ssh line you used to connect slightly to use scp to upload fasta.tgz to your pipeline directory /home/ubuntu/onecellpipe/:
scp -i "/users/fred/.ssh/aws-key.pem" fasta.tgz ubuntu@ec2-32-239-1-148.compute-1.amazonaws.com:/home/ubuntu/onecellpipe/
- Extract your data and run the pipeline:
tar xzvf fasta.tgz
nextflow onecellpipe.nf --dir run1-fasta-files
or with a config file in the format expected by indrops:
nextflow onecellpipe.nf --config run1.yaml
It is usually a good idea to start the process within a screen window to avoid ending your pipeline through an interruption of the connection!
- Optional: Use an S3 bucket
Data you have stored in the Amazon cloud storage S3 can be accessed directly on the command line of the cloud machine if you have mounted the directory as described in Part 2, step 6. It’s recommended to direct the output to a directory on the machine (using the –out option) though:
nextflow onecellpipe.nf --dir /home/ubuntu/onecellpipe/s3data/YOUR-BUCKET-NAME/run1-fasta-files --out /home/ubuntu/pipe-results
See also:
- More tips for running the OneCellPipe (command-line arguments, etc.)
- Common question about the OneCellPipe system
Part 5: Shut down the machine
Never forget to go back to the list of instances on the AWS page and shut down the machine by selecting it and choosing Action: Instance State, Terminate.
This will stop the costs of running the machine. It will also interrupt your connection(s) and delete any data you put on the cloud machine, so make sure you copy your results back to your own machine or to S3.